前些时候,腾讯云终于放开了 IPv6 给轻量应用服务器,这就马上部署上!不过 #K3s 想要支持 #IPv6 ,必须在首次安装时就指定:
Dual-stack networking must be configured when the cluster is first created. It cannot be enabled on an existing cluster once it has been started as IPv4-only.
果断把系统重置了,从头来安装一次 k3s 吧,然后让 k3s 同时支持 IPv4 和 IPv6(双栈)。
修改 hostname
如果想要指定 hostname,现在是最佳时机,等安装完 k3s 之后就不好修改了:
hostnamectl hostname bun-vm-1
配置镜像
开始安装前,把各种配置都准备好,首先是国内网络的特色,添加各大 registry 的镜像。这个镜像是从腾讯云轻量应用服务器的 k3s 应用模板里拿的,比较全了。
mkdir -p /etc/rancher/k3s
vi /etc/rancher/k3s/registries.yaml
文件的内容:
mirrors:
  docker.io:
    endpoint:
      - "https://mirror.ccs.tencentyun.com"
      - "https://docker.m.daocloud.io"
      - "https://docker.1panel.live"
  quay.io:
    endpoint:
      - "https://quay.m.daocloud.io"
      - "https://quay.dockerproxy.com"
  gcr.io:
    endpoint:
      - "https://gcr.m.daocloud.io"
      - "https://gcr.dockerproxy.com"
  ghcr.io:
    endpoint:
      - "https://ghcr.m.daocloud.io"
      - "https://ghcr.dockerproxy.com"
  k8s.gcr.io:
    endpoint:
      - "https://k8s-gcr.m.daocloud.io"
      - "https://k8s.dockerproxy.com"
  registry.k8s.io:
    endpoint:
      - "https://k8s.m.daocloud.io"
      - "https://k8s.dockerproxy.com"
  mcr.microsoft.com:
    endpoint:
      - "https://mcr.m.daocloud.io"
      - "https://mcr.dockerproxy.com"
  nvcr.io:
    endpoint:
      - "https://nvcr.m.daocloud.io"
配置 k3s 参数
这里采用配置文件的方式添加参数,创建 /etc/rancher/k3s/config.yaml 文件并添加:
flannel-ipv6-masq: true
flannel-backend: "host-gw"
cluster-cidr: "10.42.0.0/16,2001:cafe:42::/56"
service-cidr: "10.43.0.0/16,2001:cafe:43::/112"
- 要启用 IPv6 必须启用
flannel-ipv6-masq host-gw是 Flannel 的一种模式
这两个参数在 Flannel Options 有详细介绍。
要让 k3s 支持双栈,则需要设置 cluster-cidr 和 service-cidr,直接按文档配置即可。
k3s 在安装时会自动读取这个配置文件里的内容。
安装 k3s
按文档使用对国内加速的地址进行安装:
curl -sfL https://rancher-mirror.rancher.cn/k3s/k3s-install.sh | INSTALL_K3S_MIRROR=cn sh -
安装好后检查一下 k3s 的版本和节点:
$ k3s --version
k3s version v1.32.3+k3s1 (079ffa8d)
go version go1.23.6
$ kubectl get nodes
NAME       STATUS   ROLES                  AGE   VERSION
bun-vm-1   Ready    control-plane,master   45s   v1.32.3+k3s1
为 Service 启用双栈
下面部署一个 nginx 来看看 IP 绑定的效果:
apiVersion: apps/v1
kind: Deployment
metadata:
  name: hello-world
spec:
  replicas: 1
  selector:
    matchLabels:
      app: hello-world
  template:
    metadata:
      labels:
        app: hello-world
    spec:
      containers:
      - name: hello-world
        image: nginx:latest
        ports:
        - containerPort: 80

---

apiVersion: v1
kind: Service
metadata:
  name: hello-world
spec:
  ipFamilyPolicy: RequireDualStack
  selector:
    app: hello-world
  ports:
    - protocol: TCP
      port: 80
      targetPort: 80
  type: NodePort
注意在 Service 中需要指明 ipFamilyPolicy: RequireDualStack,这样才会使用双栈。
通过 kubectl apply -f 创建服务后,检查 Service:
$ kubectl describe svc hello-world
Name:                     hello-world
Namespace:                default
Labels:                   <none>
Annotations:              <none>
Selector:                 app=hello-world
Type:                     NodePort
IP Family Policy:         RequireDualStack
IP Families:              IPv4,IPv6
IP:                       10.43.90.92
IPs:                      10.43.90.92,2001:cafe:43::41d6
Port:                     <unset>  80/TCP
TargetPort:               80/TCP
NodePort:                 <unset>  31050/TCP
Endpoints:
Session Affinity:         None
External Traffic Policy:  Cluster
Internal Traffic Policy:  Cluster
Events:                   <none>
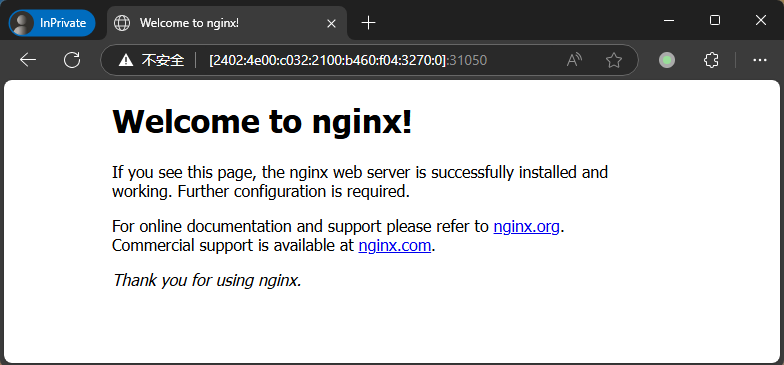
可以看到 IPs 部分已经同时显示出 Service 的 IPv4 和 IPv6 地址了。接下来可以用 curl 或者浏览器访问一下看看。
由于 Service 使用的是 NodePort 模式,需要在服务器公网地址后面加上 NodePort 里显示的端口号。(如果服务器有防火墙,需要提前放行端口。)
在浏览器中访问 IPv6 地址时,要用 [] 包裹:
http://[2402:4e00:c032:2100:b460:f04:3270:0]:31050/
这样就完成了 k3s 双栈的设置。